I have personally applied three methods to digitize 3D objects and thereby get models to the computer: Laser-Surface-Scans, CT scans, and photogrammetry. Of those, Photogrammetry is doubtlessly my favorite.
The personal reason is that I learned it in an instructive and entertaining workshop by the great Jamie MacLaren. But the more objective reasons are
- Photogrammetry is inexpensive;
- it is indifferent to size;
- it preserves the colors/texture.
It seems to be possible to capture our 3D world in 2D images! (though an obvious disadvantage compared to CT is that you only get the external aspects of an object of interest.)
The low cost of photogrammetry has to do with equipment. The technique requires no more than a camera, a computer, and a bit of patience. There are lovely citizen science projects (e.g. “The Arc/k”) which invite people to send photos from their smartphones.
The covered size range is shere phenomenal. In principle, anything that can be captured in photo can also be digitized. On the Macro side, I saw a talk at DZG conferecen 2019 by Michael Heethoff (TU Darmstadt) demonstrating their impressive “DISC3D” setup which produces detailed models of tiny insects. Or why not go microscopic? Travis Hagey (Mississippi) gave a talk at SICB this year about his successful attempts to combine SEM with photogrammetry. On the other side of the size spectrum, you can photoscan houses, and the film industry uses drone footage to create background scenes for CGI. I guess one could digitize astrological objects, if they cooperate and rotate (yes, talking to you, moon). There are practically no size limits to photogrammetry.
Finally, both Laser Surface Scans and CT scans generally loose the color information of specimens (though I guess laser surface scans could theoretically be multicolor). Unless you create artificial textures, those models do not have an appealing, realistic look, but are still good for many technical applications. In contrast, photogrammetry can even work on “spectrally enhanced” - you could also say “filter-deprived” - sensors to go into UV or IR and reveal interesting properties of material.
Since my initiating workshop with Jamie, photogrammetry has become a regular hobby of mine. Below, I briefly document some “lessons learned” and gather information that might be useful for others. I also share a test data set. Following the flow of the procedure itself, I’ll start with the photo, and end with the models. This is not considered to be a comprehensive guide for beginners - whom I’d rather refer to the many good tutorials out there. It is more of a practical guide (of which there are also many others), using an example that calculated smoothly for me and analyzing “why”.
The specimen
Most photogrammetry workshops start with stones. They have a feature-rich surface structure, diffuse reflection, and you find them easily. Technically, my test object is also a stone, but I would argue that it is more interesting than usual stones. It is a fossilised trilobite.
The final model is embedded above and can be downloaded here (‘obj’ file with textures, ~70 MB).
Here I have to credit Jamie Maclaren again, who retrieved this Calymene in the gift shop of the museum in Bristol. It probably comes from the Bristol area in Southwest Britain. The fossil is about 7.3 cm long from cephalon to pygidium. I had coincidentally seen the trilobite in a box in the UA FunMorph scanner room, and decided to scan it. My initial classification was based on the excellent trilobite resource trilobites.info.
If you would like to try yourself and follow along the steps below, you can download the set of trilobite photos here (50 photos, ~600 MB).
Photography
Photogrammetry comes from “photography”. This link should not be under-appreciated. Even though mobile phone cameras can be used, you should at least know what you are doing and why. Photo quality critically determines the quality of the final model, and also the ease of getting to it. I prefer interchangeable lens cameras, because they can have a bigger sensor and better lenses, which generally capture light better. That is not to say modern smartphones cannot produce good results; their specs are impressive. But see if you find an app good enough to control all the parameters below.
I found reliable, non-conflicting information on best photo practices for photogrammetry relatively sparse; a notable exception is a review by Sapirstein and Murray (2017). It still takes a bit of trial and error to get everything successful.
Always good to bring a camera.
Exposure:
The key requirement for a good reconstruction are sharp and well-exposed photos. Neither motion blur, nor blur due to shallow focus volume are desirable.
There are several parameters which determine exposure.
(1) Aperture:
Smaller stops (i.e. higher f numbers) are desirable for a sufficient depth of field (\(f \ge 8\)). However, if the opening becomes too small, sharpness will reduce due to diffraction effects (\(f<13\)). The perfect f-stop depends on your lens and sensor capacity, but the range above should be good.
(2) Shutter Speed:
Shutter speed is the usual lever to tweak motion blur, which is to be avoided for photogrammetry. There are two sources of motion: the object, and the camera. Ideally, both influences are excluded by fixing the object and using a tripod for the camera. In that case, shutter speed can be low enough to let more photons pass through, thereby giving flexibility for the other parameters (aperture and ISO) even in artificial light.
It might be convenient to rotate the object in front of the camera, thereby being able to use a fixed camera (and maybe fixed focus). Opposed to that, in a handheld camera situation, it is usually movement of the camera that can lead to motion blur. Because so many photos are taken, it is convenient to use a handheld camera and I would say that this is the norm for “street photogrammetry”. The shutter should then be sufficiently quick, an order of magnitude quicker than natural movement of the camera. Yet this comes at the cost of light and exposure, and has to be compensated by ISO and aperture. You slowly get it: these three parameters are an allocation problem.
(3) ISO:
The ISO should be sufficiently low to minimize sensor noise on the images. Yet better sensors have a higher reliable ISO range. The better your sensor, the higher ISO numbers you can “dare” to use.
(4) Lighting:
Sufficient external light is a prerequisite for good exposure. However, I had disappointing results when attempting to work in direct sunlight, for two reasons. The first is that light reflexes or lens glare can introduce noise that appears as scatter on the reconstructed point clouds - which, when numerous, will ruin even the best point cloud. The second reason is that shadows are usually underexposed; even worse, they might move with the sun during recording. Shadows might be compensated by a camera/lens with good dynamic range, or by filters. But in general, it is not only about getting as many photons as possible. The “perfect” photo settings depend on the circumstances.
There are two favorable circumstances. Either photograph under homogeneously overcast sky (Hooray Antwerp!), ideally rain-free days (Nay Antwerp!) where sunlight is diffuse; even fog might work. Or use a studio setting with artificial, diffuse light.
A ring flash can be very useful, because it illuminates the image in a circularly symmetric way without casting visible shadows to the sensor. An indirect studio flash might work at least equally well and even leave some interesting features. At any rate, avoid any built-in flash, because it will throw shadows that move with the camera.
Other settings:
Autofocus can fail (e.g. if tuned to eyes), but if it works, it should be set to “AF-C” (continuous) and the “spot” settings. I read that turning stabilization off (i.e. IBIS on the body, OIS on the lens) can improve results, however I kept it on in my handheld situation and guess it matters more for video. Zooming can ruin the photo sequence, so use prime lenses if available, or tape the zoom to max/min.
If color matters, de-activate the automatic white balance on your camera, which will fix the “white value target” to a color that matches your lighting (on most cameras you can choose a convenient tone). Otherwise, the auto adjustment of the white value might capture colors differently for different perspectives, which complicates feature matching.
Finally, store and use RAW files to get the full sensor information. Raw images also contain the meta data, which will inform your reconstruction software about your setup, thereby facilitating camera model fitting. They can be exposure corrected to a certain degree with photo production software, of which there are great free ones (e.g. darktable). If your camera only gives JPG, make sure images are not compressed too much (because compression creates blur and color artifacts).
Application
The example object was digitized with bad artificial light (a conventional, untidy living room lit by four LED ceiling lights).
My camera is a Fujifilm X-S10 mirrorless camera with a FUJINON XF 23mm F/1.4 R lens.
I used a ring flash, and took freehand photos in “Aperture Priority” mode (“A”, meaning that shutter speed was chosen automatically).
Aperture was fixed to f9, which should be sufficient depth while still at the upper shoulder of the sharpness curve for this lens.
ISO was 640, which the sensor handles comfortably.
It turned out that the auto focus was occasionally unreliable with the low-light, so I focused manually (which is fun!).
All other settings were fixed as indicated above.
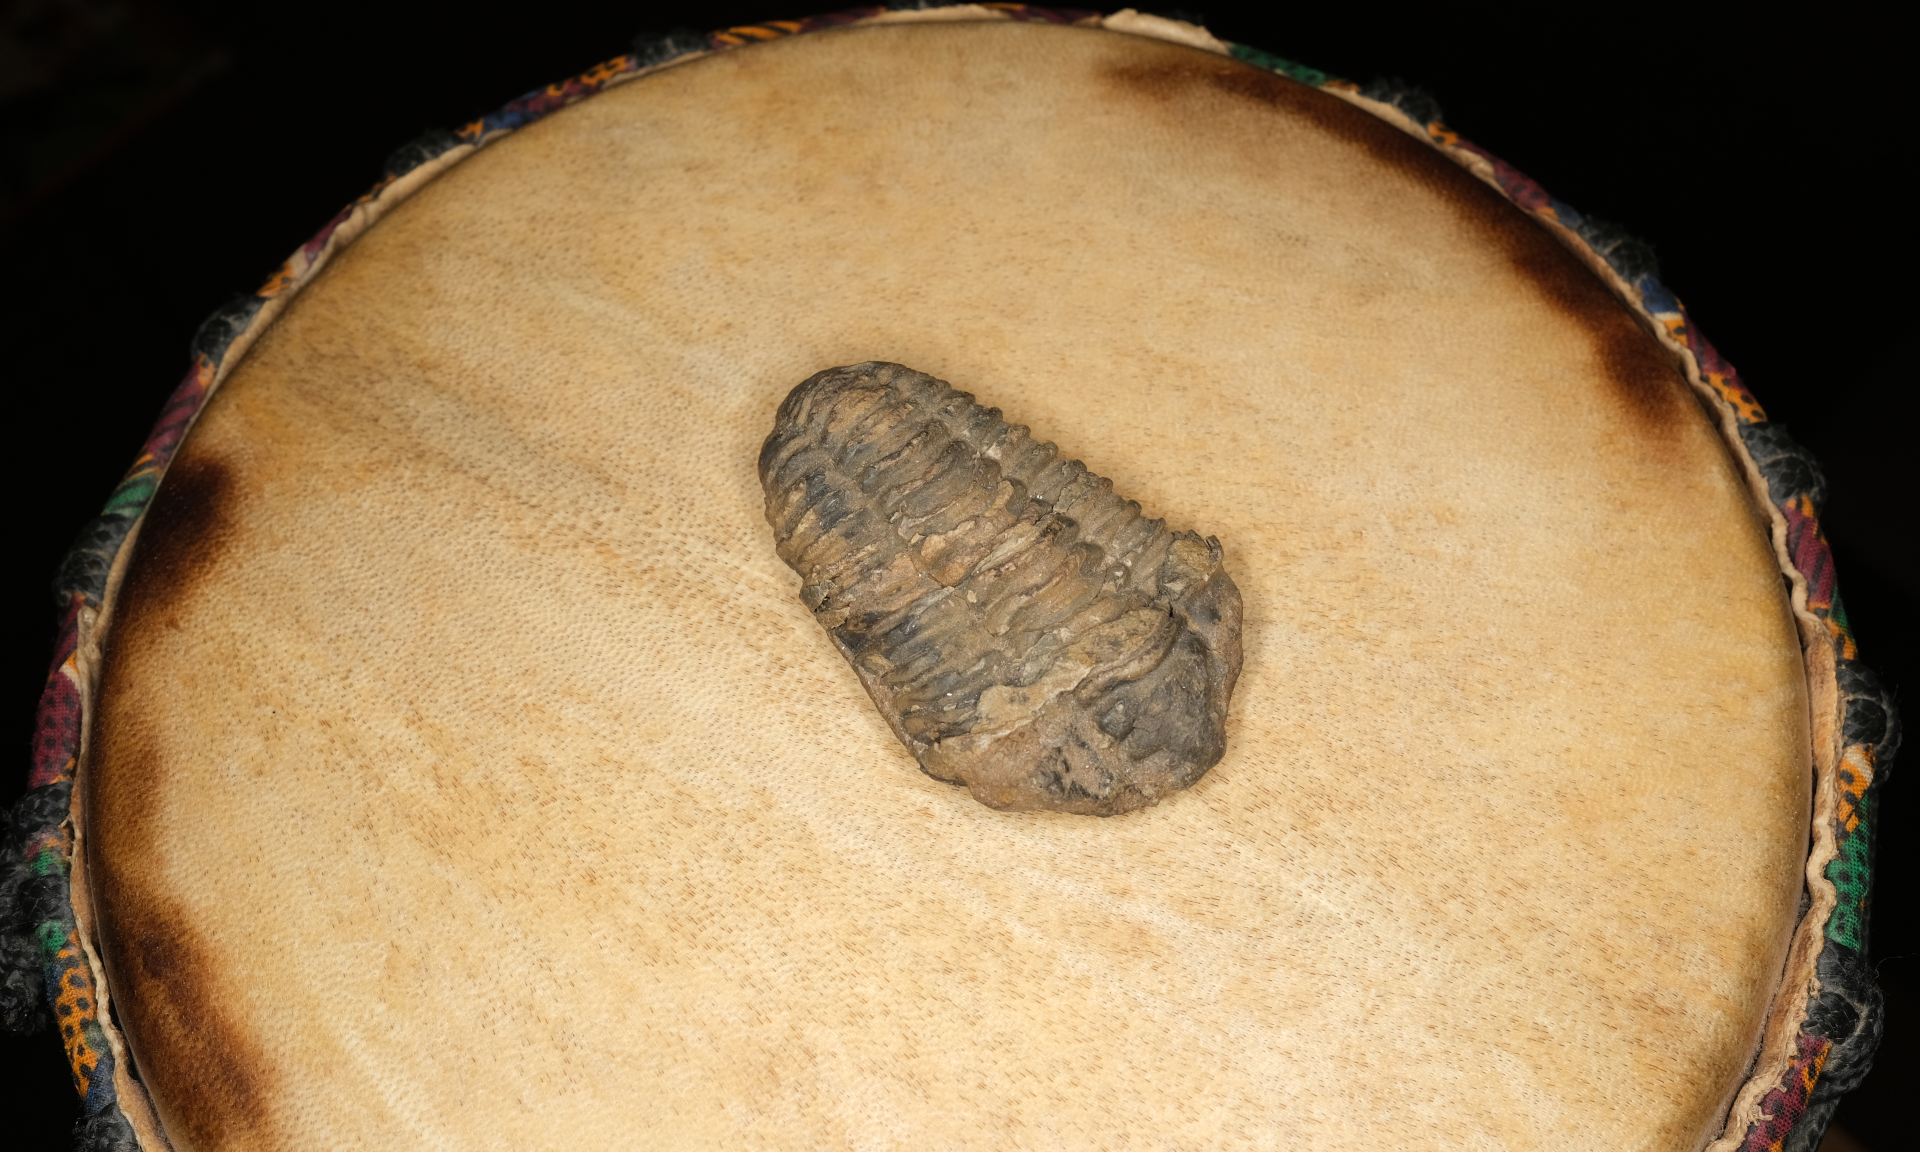
A trilobite, waiting to be photographed. I placed it on a tower of wooden toy blocks and a small Djembe drum, to have it at level for convenient photographing.
Arrangement
Most software seems to compare fotos with their neighbors when performing “feature matching” and calculating camera positions. It is therefore crucial to let consecutive photos overlap, for example by scanning the object in a rotational- or grid-like manner. If possible, place your object on an elevated plateau or even on a stick, enabling you to take photos from below, pointing upwards. To illustrate this, check the ventral edge of my trilobite model, of which I did not get a good perspective (in fact I did, but the underexposed photos could not be aligned). Movable camera screens come in useful to get snapshots from weird angles. Plan ahead your path around the object, and try to get sharp shots of aspects that are hidden behind other structural features.
It is highly recommended to add a color checker and a scale bar somewere beside the object, and include them in the photo series. However, that is only needed if you want to get precise size or color measures ex post.
I have not found out yet whether it is good to have a feature-rich background, or not (assuming it is perfectly static, unlike trees and leaves in the wind). I have used a military camouflage “tablecloth” and could thereby improve the capture of uniform objects which had little structure by themselves.

The trilobite model in "Metashape".
Processing
Among the many options for photo reconstruction software (e.g. see review by Peter Falkingham) there are two which I have been using out myself: Meshroom and Metashape.
The first one, Meshroom, is free and generated good results for me, however I had some trouble with a few projects (maybe has to do with GPU support).
It is also considered to be slow, which does not matter much for my hobby.
The other one, Metashape, is “industry standard” and proprietary (but relatively cheap for educational purposes, which I fulfil hereby).
It can run without a GPU (slower), or fully use the one available, and has given me reliable results.
But it is not perfect either (clumsy point selection and cleaning, some camera position failures, limited mesh editing options, no continuous progress saving as in meshroom).
With good photos, both programs usually yield excellent results.
In the case of the trilobite, I found that “Meshroom” yielded the best results (personal, visual judgement).
In general the typical photogrammetry algorithm involves:
- feature extraction
- feature matching
- camera position calculation
- point cloud generation
- mesh and texture computation
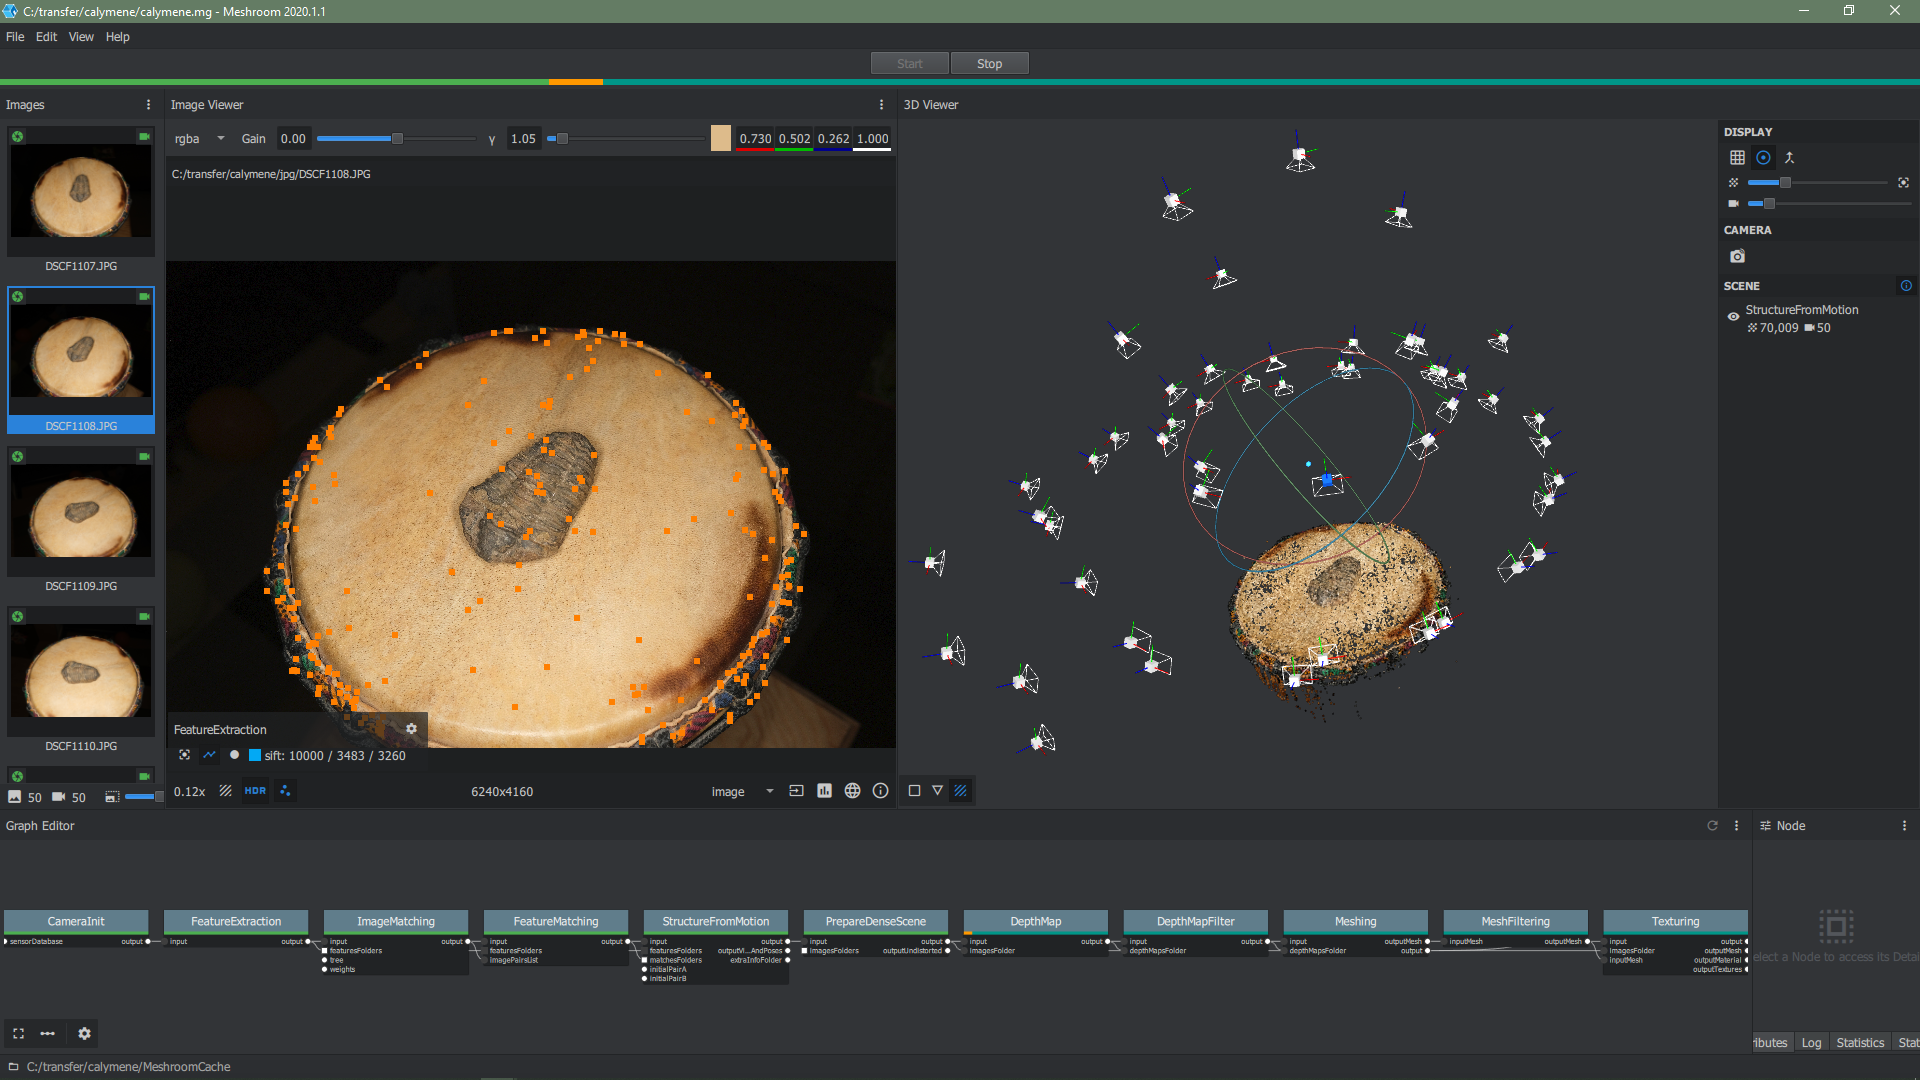
The processing procedure in "meshroom" is visualized as an interactive graph in the lower part of the workspace.
There are intermediate steps (e.g. point clouds) which serve inspection of the process to ensure good matching. The final result is, depending on your purpose, the export of a point cloud or mesh. The whole workflow for the trilobite data set should be doable in about an hour (medium quality) on an average personal computer. It can take considerably longer for generating a high quality point cloud and mesh. It can be particularly annoying if bad photo quality leads to off-surface points that require manual cleaning.
Post-Processing
Having the model might not be your ultimate goal. For example, to capture an object from all sides, one must usually take multiple photograms from different sides, and stitch the partial models together in post processing. There is a number of useful 3D data processing programs. The simplest and most available one might be meshlab. I have seen colleagues use VG Studio or Geomagic, which are far more capable and usable; however those require their own grants to purchase a license, and I would never buy them. Not least, blender has good sculpting capabilities for model post processing and is definitely the way to go if you aim at animation.
My personal use of the models has been limited so far, and I only recently discovered sketchfab to share the beautiful outcomes of my little 3D photo projects.

Importing the finished model to meshlab.
Conclusion
Photogrammetry did not always work “out of the box” for me. Objects are usually more challenging than that trilobite.
And in fact that’s part of what made photogrammetry fun to me: tinkering around, and systematically tweaking parameters! You can always get better photos, better models, and sometimes these two don’t even correlate. I learned a lot about photography in general on the way, and will continue to explore it.
I might also post particularly successful, colorful, small or big models here in the future.
I’m looking forward to your additions and comments!